


If I miss daily checks, I risk food-safety failures, equipment downtime, pest issues, and trouble during a UAE inspection. The fix is simple: I use one daily routine that covers opening checks, service checks, and closing checks.
Here’s the short version:
- Before opening: I check handwash sinks, staff hygiene points, food-contact surfaces, prep zones, and bins.
- At opening and during service: I log fridge temperatures at 5 °C or below, freezer temperatures at −18 °C or below, hot holding at 60 °C or above, and I check probes, ovens, fryers, and other kitchen equipment.
- At closing: I inspect hoods, filters, drains, grease traps, pest signs, fire-safety items, and daily records.
- For records: I log dates in DD/MM/YYYY, use °C and metric units, and note any fault, action taken, and staff initials.
In UAE kitchens, heat, long shifts, and mixed-language teams can lead to missed steps. That’s why I keep the checklist short, clear, and easy to follow. Good daily records help me show food-safety control, spot faults early, and keep the kitchen ready for the next shift.
Key numbers I do not ignore:
- 38–43 °C handwash water
- 5 °C or below for refrigerators
- −18 °C or below for freezers
- 60 °C or above for hot holding
- 175–180 °C fryer test range
- 30–45 minutes preheat time for hot holding units
- 25% grease trap fill level as a trigger for cleaning
I treat this checklist as a daily habit: clean, check, log, fix, and sign off.
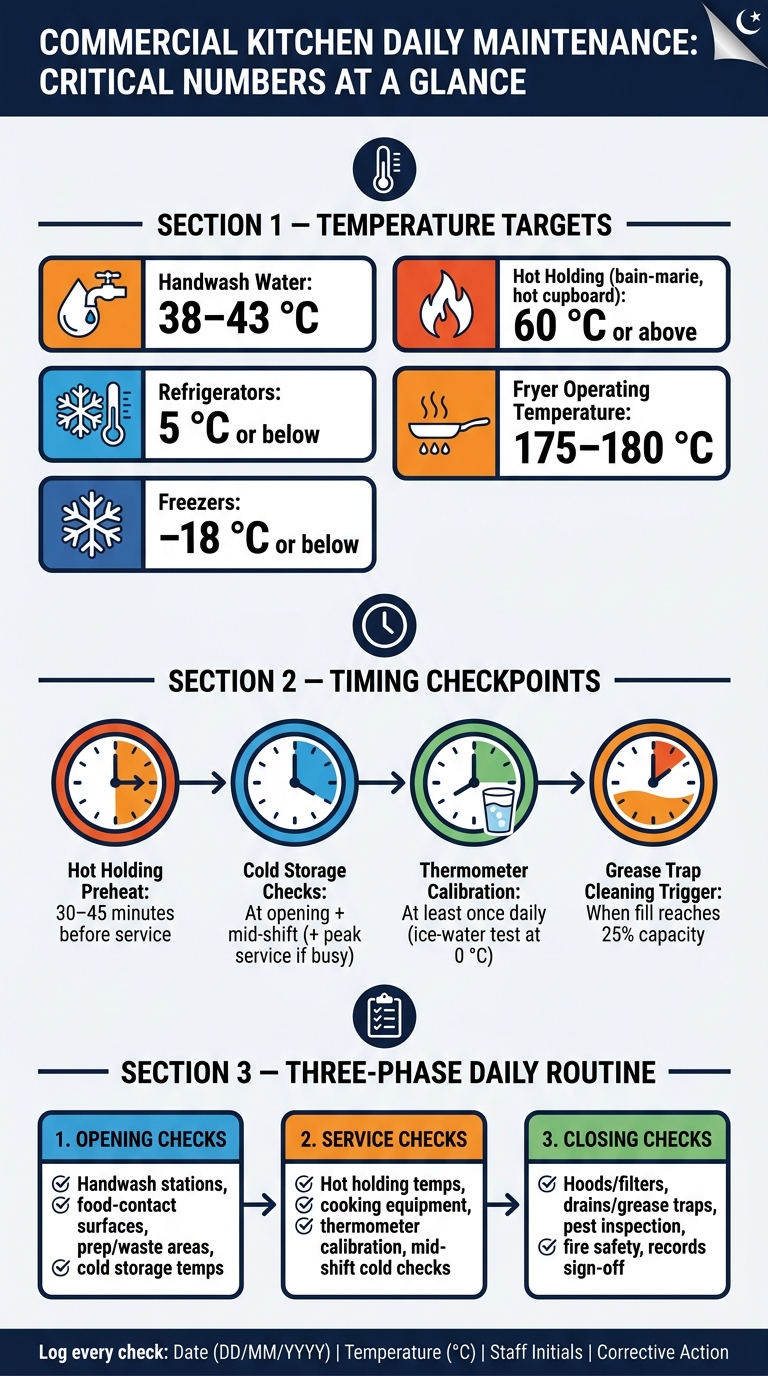
Commercial Kitchen Daily Checklist: Key Temperature & Safety Numbers
Opening Checks: Hygiene, Handwashing, and Food-Contact Surfaces
Before any prep starts, opening checks need to cover the basics: staff hygiene points, clean food-contact surfaces, and tidy waste areas. Once these checks are signed off, the team can move into surface sanitising before service.
Check Handwash Stations and Staff Hygiene Points
Check every handwash sink first. Each one should have potable hot and cold running water, liquid soap in a fixed dispenser, and single-use paper towels or another approved drying method. These sinks are for handwashing only, not for food, utensils, or wastewater. A covered, foot-operated bin should sit within easy reach of paper-towel stations.
Handwash water should feel warm and comfortable, around 38–43 °C. Where possible, use sensor, knee, or foot-operated taps.
Hygiene signs should be easy to see at every station. In kitchens with multinational teams, multilingual signs and clear pictograms make a big difference. They help everyone follow the same steps without guesswork. Also check that hand sanitiser is available at higher-risk stations, especially in raw meat, ready-to-eat, and plating areas.
Log each station by ID, the items checked, the result, the time, and the staff member’s initials in a daily hygiene log.
After the handwash points are ready, move straight to food-contact surface sanitising.
Sanitise All Food-Contact Surfaces Before Service
Before prep begins, wash, rinse, sanitise, and air-dry all food-contact surfaces. That includes worktops, cutting boards, knives, utensils, small equipment, and thermometers. Do the same again between raw and ready-to-eat tasks, between different raw animal foods, and any time contamination is suspected.
Use an approved food-grade sanitiser at the label concentration. Check it with test strips, and give it the full contact time stated on the label.
Also check colour-coded tools and boards. They should be stored in the right zones and kept separate by food group. If a board is damaged or heavily scored, take it out and replace it. Record each completed task on a daily sanitation checklist with the date in DD/MM/YYYY format, the time, the item cleaned, and the staff member’s name or initials.
If any food touched an unsanitised surface, discard it.
Walk Through Prep, Waste, and Bin Areas Before Opening
Walk through the prep, waste, and bin areas before opening. Check prep floors and lower shelves for grease, spills, or residue. Make sure no food has been left uncovered overnight. If you spot a problem, clean it before prep begins.
Internal bins should be clean, lined properly, fitted with lids, and not overfilled. Check that waste is separated correctly. Then look at the external waste area. Bulk containers should be secure, floors should be clear, and there should be no loose bags or spilled waste. Empty organic waste daily to cut odour and pest risk.
With the area cleared, the next step is temperature and equipment checks.
sbb-itb-19c3c9a
Temperature and Equipment Checks at Opening and During Service
Once the prep and waste areas are clear, temperature and equipment checks come next. This is where small issues show up before they turn into service problems. A fridge drifting above temp or a fryer that takes too long to recover can throw off the whole shift.
Record Cold Storage Temperatures and Check Condition
Record each cold unit’s date, time, unit ID, temperature, initials, and corrective action. Refrigerators should run at 5 °C or below, and freezers at −18 °C or below. Take readings at opening and again mid-shift. In busy kitchens, add a third check during peak service.
Each time you check temperatures, look at the unit’s condition too. Check door seals for cracks, gaps, or signs of hardening. Open and close the door to make sure it shuts on its own. Inside the unit, food should be covered, labelled, and stored with enough space for airflow. That means no boxes pushed against the back wall and nothing blocking fan vents.
If you spot a spill, clean it at once with a food-safe detergent. If a seal is damaged or a shelf is broken, note it in the maintenance record so it can be dealt with.
Once cold units are holding steady, move on to hot holding and cooking equipment.
Check Hot Holding and Cooking Equipment Performance
Preheat hot holding equipment - bain-maries, hot cupboards, and heated display units - 30 to 45 minutes before service. Then check that the holding area has reached at least 60 °C with a calibrated probe, not only the built-in display. During service, spot-check the core temperature of held food to make sure it stays at 60 °C or above.
For bain-maries, make sure water levels are enough and keep lids or covers on where possible to hold heat.
For cooking equipment, do a quick heat-up check at opening. Preheat ovens to a standard set point, then confirm the temperature with a probe or oven thermometer. Test fryers at operating temperature, usually 175–180 °C, and see whether the oil returns to set temperature soon after loading. That’s the recovery time check.
With grills and ranges, watch for even heat across the surface. Also check that:
- indicator lights work
- control panels respond properly
- pilot or ignition systems fire as they should
If you find slow heating, uneven cooking, odd noise, or ignition trouble, log it with the equipment ID, time, fault, and temporary action.
Confirm Thermometer Calibration and Update Maintenance Logs
Finish this part of the check by dealing with any thermometer issues and updating the records. Clean and sanitise probe thermometers before and after every use. At least once a day, do a quick ice-water test. The probe should read about 0 °C. Record the result on the thermometer check sheet.
If a thermometer falls outside the allowed tolerance, remove it from use, label it as faulty, and either recalibrate it, if it can be adjusted, or replace it. Recalibration should also happen after a drop, impact, or any reading that doesn’t look right.
Maintenance logs for all equipment - fridges, freezers, ovens, and fryers - should include the equipment ID, model, serial number, date, fault, action, and signature.
Closing Checks: Ventilation, Drains, Grease Traps, and Pest Signs
Once service is over, the focus shifts to the parts of the kitchen that quietly cause trouble if they’re ignored: airflow, drainage, grease build-up, and pest risk. These end-of-shift checks help keep all four under control.
Inspect Hoods, Filters, and Extraction Performance
At closing, wipe any hood surfaces you can safely reach, empty grease cups or troughs, and make sure the filters are fitted properly and not damaged. Check baffle filters for correct alignment, dents, or corrosion. If a filter is bent or sitting out of place, it can cut grease capture and lead to poor extraction.
Then run the exhaust fan at full speed and do a simple airflow check with a sheet of lightweight paper held at the hood opening. It should pull in steadily. If it doesn’t, extraction may be weak. Also listen for odd fan noise or vibration. That can point to worn bearings or loose parts. Any fault should go into the ventilation maintenance log with the date, time, and a short note.
Once the extraction check is done, move on to floor drains and grease traps before the last pest walk-through.
Clear Floor Drains and Check Grease Trap Condition
Remove drain grates and clear out food scraps, packaging bits, and other solids by hand. Run clean water through each drain and watch for slow drainage, gurgling, or backflow. Those signs can mean there’s a partial blockage deeper in the line. Scrub around each drain with a suitable disinfectant, then make sure all grates and covers are secure and seated properly.
For grease traps, check for leaks, overflow staining, and odour. Then review the log for the last service date and the next due date. When grease and solids reach about 25% of the trap’s capacity, cleaning should be arranged to avoid clogs and overflows. In the UAE, grease traps should be emptied and cleaned by approved contractors, and service records must be kept on-site.
Check for Pest Activity and Structural Hygiene Risks
Inspect corners, under counters, behind equipment, and dry-store shelves for droppings, insects, gnaw marks, and torn packaging. Pay close attention to spots where pests tend to show up first, such as:
- waste and bin areas
- dishwashing stations
- under refrigerated counters
- bulk dry storage areas where warmth and food residue build up
Check door sweeps for gaps along the floor. Look at fly screens on windows and ventilation openings for rips, holes, or loose frames. Seals around pipes, cables, and skirting boards also need a close look. Even a small crack or gap can turn into a hiding spot.
In Dubai, food establishments must keep a valid contract with a licensed pest control operator, keep treatment certificates on-site, and document pest sightings and structural defects for follow-up.
Record all findings, whether the result is clear or there’s a problem, in the pest-control inspection log.
Finish with fire-safety checks and daily sign-off records.
Daily Safety Records: Fire Readiness, Staff Sign-Off, and Fault Follow-Up
Check Fire-Safety Equipment and Emergency Access
After the last hygiene and pest checks, finish the shift with a fire-readiness check and sign-off.
Check that extinguishers are mounted properly, not blocked, and have a valid inspection tag. Make sure fire blankets are sealed and easy to reach. Look at fixed suppression systems above cooking lines and confirm the control-panel lights show normal status. Check that gas shut-off valves are labelled in English and Arabic, and that exits are clear and lit. Staff assigned to this task should know where the gas shut-off valves are and how to use them, with emergency instructions posted nearby. Fire-safety failures can lead to fines or even closure under UAE rules.
Once the fire-readiness check is done, file the day’s records straight away.
Complete Daily Logs and Report Defects Without Delay
At close of shift, file the day’s sanitation checklist, temperature log, maintenance notes, grease trap and drain log, and pest record together. A checklist means nothing if it isn’t signed, dated, and filed. Each record should show the date, the item checked, the reading or status, staff initials, and any corrective action.
If equipment is faulty, tag it out of service at once. Then record the equipment ID, the issue, the action taken, who was told, and when. Once maintenance clears the item, add the return-to-service date. Keep completed records in a labelled binder or a secure digital folder so staff can pull them up fast during an unannounced inspection.
Conclusion: Build a Repeatable Daily Checklist That Supports Compliance and Uptime
A short daily checklist helps keep the kitchen clean, safe, compliant, and ready for the next service.
FAQs
Who should complete the daily kitchen checklist?
Trained kitchen staff should complete the daily kitchen checklist as part of routine monitoring and maintenance. That usually means cleaning surfaces, filtering fryers, checking equipment temperatures, and keeping an eye out for anything unusual. Staff should initial the checklist once each task is done.
The Person In-Charge (PIC) has final responsibility for oversight. That includes verifying checks, keeping logs up to date, and handling corrective actions.
What should I do if a fridge or freezer is out of temperature?
Take immediate corrective action if a refrigerator falls outside 1°C to 4°C or a freezer goes above -18°C. Your Person in Charge (PIC) needs to spot these changes fast, because delays increase food safety risks.
If temperatures go above 4°C, prepare and serve the affected items the same day. Then recalibrate the monitoring equipment, check what caused the issue, and record every action in your maintenance records.
How should I store daily kitchen records for UAE inspections?
Keep daily logs neat, accurate, and signed by the staff member responsible. Where needed, add a manager or Person In-Charge countersignature. Store key records on-site in one designated place so they’re easy to find during an inspection.
Keep temperature logs for at least one year, fire safety inspection records for at least three years, and general maintenance or service records for at least five years. You can store records electronically, as long as the copies clearly match the originals and can be produced in English on request.
