


Most kitchen budgets go off track for one simple reason: people price equipment first and the kitchen second.
If I were planning a kitchen in the UAE, I’d set the budget around menu, output, layout, and approvals before buying anything. That matters because equipment often takes 45–55% of setup cost, ventilation can take 15–20%, and late layout changes can add 10–15% more. As a rough guide, a small cloud kitchen may sit around AED 80,000 to AED 150,000, while a larger setup can go beyond AED 300,000.
Here’s the short version:
- I’d start with day-one volume, not peak-day guesses
- I’d map the kitchen into receiving, storage, prep, cooking, pass, and wash
- I’d budget for Dubai Municipality / ADAFSA rules, Civil Defence, grease traps, drainage, power, gas, and extraction from the start
- I’d split spending into open-now items and buy-later items
- I’d keep a 10–15% buffer for changes during fit-out and approvals
A few numbers help keep the plan grounded:
- 0.46 m² of kitchen space per customer seat is a useful check
- Aisles should be at least 1.2 metres wide
- Phase 1 capacity should cover about 20% above expected launch volume
- Many commercial units need three-phase power and DEWA-compliant electrical work
The core idea is simple: I’d spend first on what keeps the kitchen safe, approved, and able to produce on day one, then leave extra capacity and add-ons for Phase 2.
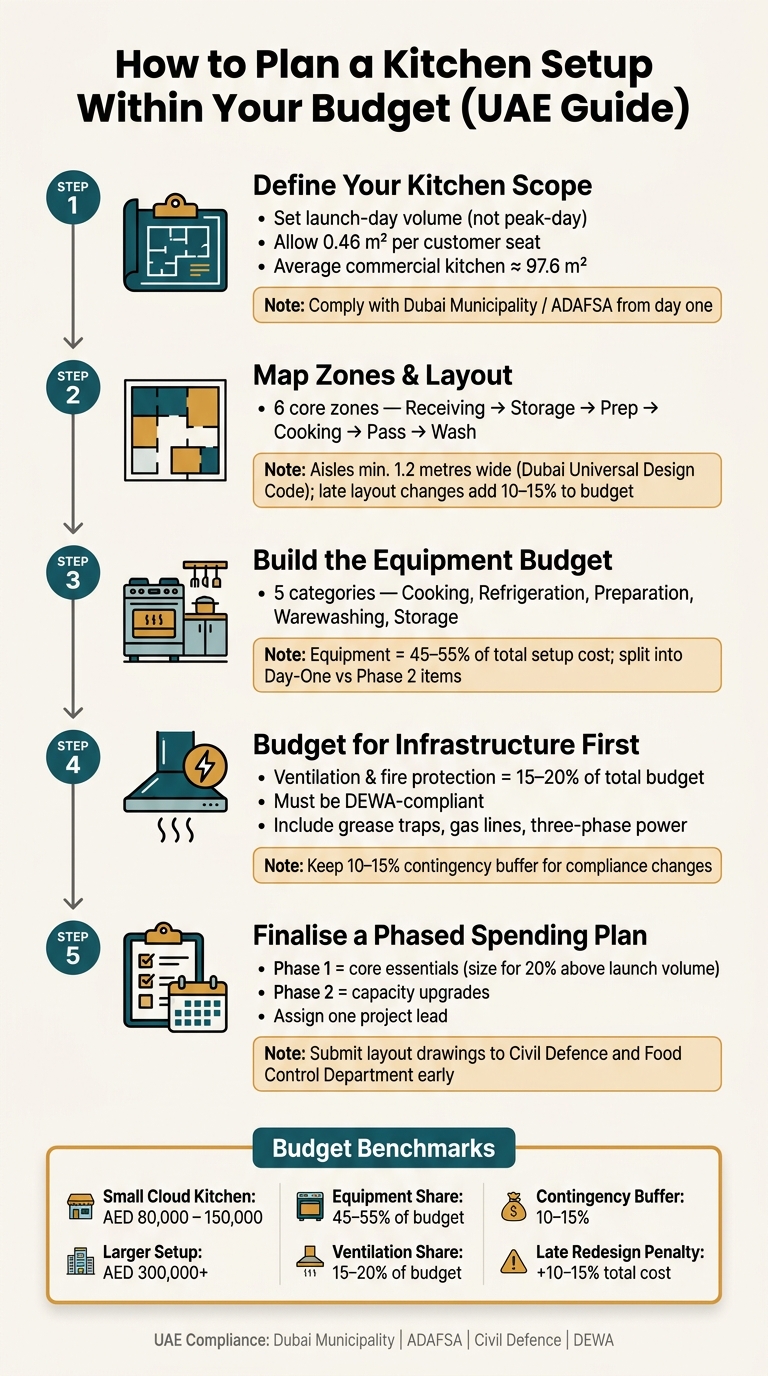
How to Plan a Kitchen Setup Within Your Budget in the UAE
Step 1: Define your kitchen scope before setting a budget
Set your launch volume, menu complexity and growth limits before you start pricing the kitchen.
Set your concept, menu and production volume
Your business model shapes almost every cost call. A QSR needs a fast, high-flow setup. Fine dining needs room for plating and tighter station planning. A cloud kitchen usually needs a compact layout built around delivery.
Start with your launch-day covers or orders, not your busiest possible day. In the UAE, guidance suggests allowing 0.46 m² of kitchen space per customer seat, and the average commercial kitchen is about 97.6 m². Use that as a sense check, not a target. If your concept is starting small, a kitchen that’s too big can burn cash you could have put into better equipment or a fit-out that’s ready for inspection.
Be clear about what the kitchen must handle on day one and what can wait. Fund the cooking and prep capacity you need from the start. Extra equipment and later-stage expansion items can often come after the business starts bringing in revenue.
That launch volume also shapes which compliance features need to be built in from the first day.
List the UAE compliance items that affect cost from the start
Compliance changes your layout, equipment plan and fit-out spend from day one.
Dubai Municipality and ADAFSA require non-absorbent finishes, grease traps, dedicated handwash basins, and separate raw and cooked zones. That zone-based setup sits at the heart of HACCP compliance, so it affects where prep, cooking and storage go. This is why layout drawings should go to Civil Defence and the right food control authority early. Leave it late, and redesign work can add 10–15% to the total project budget.
If you’re setting up in Dubai, your main authority is Dubai Municipality. In Abu Dhabi, you’ll need to line up with ADAFSA from the start. That one detail changes the checklists you follow and the drawings you should prepare first.
These requirements flow straight into the layout and budget choices in Step 2.
Once the scope is fixed, turn it into zones and budget priorities.
sbb-itb-19c3c9a
Step 2: Turn workflow and layout into budget priorities
Once your scope is locked, turn it into a layout that supports workflow, hygiene and compliance. This matters more than many teams expect. Layout mistakes are some of the most expensive problems to fix once fit-out work begins.
Map the kitchen into core zones
Every commercial kitchen needs a clear flow between receiving, storage, prep, cooking, plating/pass and wash areas. Build each zone around what your menu needs in practice, not around a floor plan that simply looks neat on paper.
For example, a high-volume QSR usually needs more room for cooking and pass-through service. A cloud kitchen often works better with a tighter layout and more capacity for prep and storage. Raw and cooked zones should stay separate for HACCP compliance. Aisles should be at least 1.2 metres wide under the Dubai Universal Design Code.
That zone map then feeds straight into your equipment list and budget worksheet.
Use a scaled layout and zone-based budget worksheet
After the zones are mapped, draw them to scale. Mark equipment, sinks, handwash points, door swings, drainage and ventilation routes. This is the stage where layout issues show up early, while they’re still cheaper to deal with.
Next to the scaled plan, assign a provisional AED budget to each zone. That zone sheet helps you spot areas where spending is drifting too high before procurement starts.
Use specialist design support to cut redesign costs
Before the drawings are final, have a specialist review the layout to avoid expensive rework. A specialist kitchen designer can spot clashes in layout, drainage, extraction and approvals before they turn into costly site changes.
That support may include:
- Compliant layout planning
- Equipment positioning
- Grease trap and drainage coordination
- Installation planning
Used well, this helps you avoid the changes that send projects over budget.
Step 3: Build the equipment budget and decide what to buy now
Use your zone plan to turn each area into a purchase list, not a wishlist. Each zone should become a line-item equipment list with a clear budget against it.
Work through five categories: cooking, refrigeration, preparation, warewashing and storage. For every item, decide if you need it on day one or if it can wait until volume grows.
Day-one items need to support the menu, workflow and compliance from the moment you open. That often means the core cookline, refrigeration sized for your menu, stainless prep surfaces, separate handwashing stations and basic storage. Bring in mobile modular units later only if they won’t affect output or safety.
| Category | Must-have equipment examples | Sizing rule |
|---|---|---|
| Cooking | Ovens, cooklines | Match to menu complexity and prioritise efficient operation. |
| Refrigeration | Walk-in cold rooms, reach-in chillers | Scale based on perishables volume. |
| Preparation | Stainless steel tables, zone-based prep units | Keep raw and cooked zones separate for HACCP compliance. |
| Warewashing | Dishwashers, pot-wash sinks | Include these early to meet UAE compliance requirements. |
| Storage | Stainless shelving, modular dry storage | Match to inventory turnover and use casters for flexibility. |
Before you buy anything, test the list against your forecast. It’s easy to overspend on kit that looks useful but won’t earn its keep in the first few months. Size core equipment with a bit of headroom for near-term growth, but don’t go too far. A kitchen packed with underused equipment can drain cash fast.
Get line-item quotations before locking the budget
Once the equipment list is fixed, ask suppliers for line-item quotations so you can compare prices against the approved scope. Each quote should match the approved layout, spec and utility points. If one supplier prices a different model, a different size or different connections, the comparison stops being clean.
After the equipment is fixed, budget for the infrastructure around it too. That includes extraction, fire systems and utilities, because those are the items that protect safety and approvals.
Step 4: Budget for ventilation, fire safety, utilities and installation first
Once your equipment list is set, don't treat infrastructure like a last-minute add-on. Ventilation, fire suppression, drainage, gas lines, and electrical capacity are fixed cost blocks. They are not nice-to-haves. Miss the mark on even one of them, and the whole budget can drift off course.
That’s why these systems need to be priced before any equipment upgrades. Your budget should reflect what the kitchen needs to open and run from day one.
Treat ventilation and fire protection as fixed cost blocks
Ventilation should be sized to the cookline, hood length, and extract load. In plain terms, build it around the actual cooking load, not a generic fit-out estimate. If the cookline changes, the ventilation load changes too.
Ventilation and fire protection also need to be part of Civil Defence and Food Control approvals from the start. Leave them vague, and you risk delays later.
Set aside 15–20% of your total kitchen budget for ventilation and fire protection. Lock that figure in before you finalise any premium equipment choices.
Include grease traps, plumbing, gas and electrical capacity
Plumbing and drainage should match the approved layout. Water, gas, and electrical runs need to be mapped to the final equipment plan before any groundwork starts. The simplest way to do this? Use the approved equipment quotes to size each utility run properly.
Electrical capacity needs extra care. Most commercial cooking equipment runs on three-phase power, and all electrical work must be DEWA-compliant from the outset. If the site’s current supply can’t handle the equipment load, the power upgrade has to be priced into the project from day one, not found halfway through installation.
Match all utility costs to the final layout and equipment list before installation begins.
Add installation, approvals and a contingency buffer
Installation, testing, and permit revisions are often left out of early budgets. That sounds small on paper, but it can sting later. One of the best ways to protect your budget is to submit detailed layout drawings to Civil Defence and the Food Control Department early. Late or incorrect submissions can lead to rework costs of 10–15% of total project spend.
A contingency buffer matters here too. Set aside 10–15% for layout revisions or compliance changes that show up during installation.
Once these fixed costs are priced, split whatever is left between opening essentials and later upgrades.
Step 5: Finalise a phased spending plan and next steps
Once you’ve priced the fixed infrastructure, turn what’s left into a phased spending plan. The idea is simple: separate what the kitchen needs to open from what can wait until demand picks up.
Build a phased budget sheet for opening and Phase 2 upgrades
Split the budget into Phase 1 opening essentials and Phase 2 capacity upgrades. Put core equipment, ventilation, fire protection, approvals, and installation into Phase 1. Keep extra cold storage and modular units for Phase 2.
If expansion is likely, choose modular equipment on casters. It gives you more room to adjust later without tearing everything apart. Also, size Phase 1 for about 20% above projected production volume so you don’t hit limits too early.
Track decisions with a checklist and one project lead
After the phases are locked in, assign one owner to track everything. That person should follow each sign-off in the right order: layout drawings approved by Civil Defence and the Food Control Department, the equipment list finalised, utility runs confirmed, fire suppression signed off, and installation completed.
Without one person keeping the whole thing moving, small delays can snowball. Decisions get missed, costs creep up, and approvals take longer than they should.
Conclusion: Spend on what protects operations, safety and compliance
Spend first on the parts that protect operations, safety, and compliance. When the layout fits your menu, the equipment matches your production volume, and each system meets UAE regulatory standards, the money spent tends to come back through better efficiency, fewer delays, and a kitchen that’s ready to grow.
FAQs
How do I know if my kitchen budget is realistic?
Start with a volume forecast based on your menu, peak capacity, and growth goals. That gives you a grounded budget instead of a guess.
In most cases, equipment takes up 45–55% of total spend. You’ll also need to account for infrastructure upgrades, especially in older buildings, where costs can range from AED 183,500 to AED 550,500.
Set aside a 10–15% buffer for permits, regulatory requirements, and design changes. It’s also smart to check early that your layout meets UAE standards, so you don’t get hit with costly redraws or site changes later.
And one more thing: budget for energy use and maintenance too, not just the upfront installation cost.
Should I buy all kitchen equipment before opening?
Not necessarily. Prioritise the equipment you actually need based on your menu, output, and day-to-day workflow instead of buying everything in one go.
It also helps to order key items early. Commercial kitchen equipment can take 12 to 16 weeks to procure, and those delays can slow down your launch if you’re not careful.
If upfront costs feel heavy, look at modular or multi-use equipment first. That can give you more room to manage your budget without slowing down the kitchen setup. And before you sign off on any purchase, check that every item meets UAE health, safety, and fire compliance rules.
What approvals can increase kitchen setup costs in the UAE?
In the UAE, project costs often go up when the first kitchen design doesn’t meet local rules. That usually means rework, and that alone can add 10 to 15 per cent to the total budget.
There are other cost points too. You may need approvals tied to health, hygiene, and drainage, along with fire suppression systems, alarms, and emergency exits. If you hire consultants or contractors without the right certification, things can get messy fast: delayed timelines, rejected plans, and utility changes to pass inspections.
