


If a municipality inspector walked in today, could you show every record in under 2 minutes and pass a kitchen walk-through at the same time? That is the standard most UAE food businesses are held to.
When I prepare a kitchen for inspection, I focus on four things: papers, cleanliness, food safety controls, and staff practice. In simple terms, that means keeping licences current, logging temperatures at least 3 times a day, storing chilled food at 5°C or below, frozen food at −18°C or below, and hot-held food at 63°C or above, while making sure staff hygiene, pest checks, waste areas, and equipment condition all match the written records.
Here’s the short version:
- Keep one inspection file ready with licences, approvals, HACCP records, service reports, and calibration logs.
- Assign one Person in Charge on every shift to handle records, checks, and inspector questions.
- Check labels, dates, and FIFO daily so raw and ready-to-eat food stay apart.
- Log temperatures on time and remove any faulty thermometer or unit from use.
- Clean what inspectors see first: prep areas, chillers, drains, hoods, seals, floors, and bin areas.
- Make staff follow handwashing and illness rules every shift, not only before a visit.
- Run a weekly mock inspection and fix failed items before the next service.
The main point is simple: inspection readiness should look like normal daily work, not a last-minute tidy-up. If the kitchen floor, records, and staff habits match each other every day, inspection day becomes much easier.
Step 1: Verify licences, permits, and inspection records
Keep one inspection file with current printed copies and a digital backup of every approval, certificate, and record linked to the kitchen.
Check approvals and compliance documents
These documents need to match the kitchen as it exists today: built, fitted out, and in use. Keep all approvals required by the Food Control Department and Civil Defence together in one file, and make sure each one is current. Keep the fire-suppression, ventilation, drainage, grease-trap, and electrical compliance certificates on-site as well.
Prepare FSMS records, layout drawings, and equipment-service logs
Keep HACCP, layout, and equipment-service records that line up with the kitchen’s approved setup. Layout drawings should be approved before fit-out, and they must reflect the finished kitchen. Maintenance and service records show that equipment is being serviced and repaired to the required standard.
Store the file where the Person in Charge can produce it straight away during an inspection. Once the documents are ready, move to the visible kitchen conditions inspectors check first.
Step 2: Fix the kitchen conditions inspectors see first
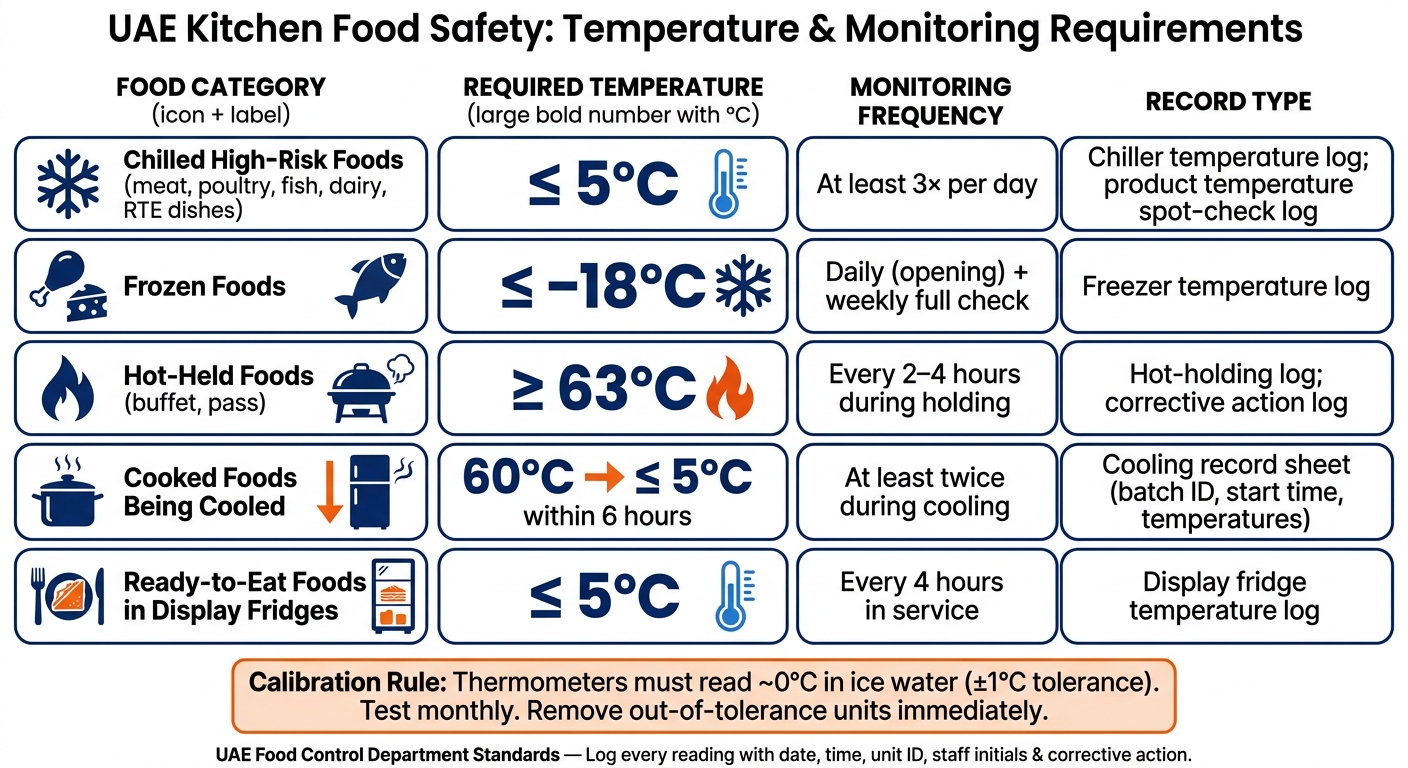
UAE Kitchen Food Safety Temperature & Monitoring Quick Reference
Once the paperwork is in order, shift your attention to the kitchen floor. This is the part inspectors size up in seconds. Walk the space the way they would and look hard at the areas that show hygiene problems first. In most kitchens, that means surfaces, equipment, storage, and temperature control.
Clean all food-prep, cooking, washing, and storage areas to schedule
Your cleaning schedule should be written down and easy to follow. It needs to show each area, how often it must be cleaned, which staff member is responsible, and the sign-off date, time, and supervisor check. That can be as specific as “prep bench – hot kitchen” or “hood filter – range 1”.
Prep benches and cooklines should be cleaned after each service and at least every four hours during service hours. Floors should be cleaned after each service and again at close. Chillers should be deep-cleaned weekly, and hood filters should be degreased monthly, or in line with the manufacturer’s instructions.
During the pre-inspection walk-through, match the real condition of the kitchen against the schedule. If you spot mould on a chiller seal, food debris in a drain cover, or grease around a fryer, the record does not match reality. That’s a red flag. Clean it at once, fix the record, and re-sign it before the visit.
Check food storage, labelling, and temperature control
Everything in chillers and dry stores should be labelled with the product name, preparation or opening date, and use-by date. Staff should also carry out a daily expiry check and remove anything that is out of date. Raw meat, poultry, and seafood must be kept separate from ready-to-eat foods, with dedicated shelves and sealed containers. Food should sit at least 15 cm off the floor and away from walls so cleaning and pest checks can be done properly.
FIFO (First In, First Out) needs to be applied every day. Newer stock goes behind older stock, and staff should check dates before using anything.
After storage and labelling are sorted, confirm that chilled, frozen, and hot-held food is staying within the right temperature range. Use calibrated digital thermometers and take readings at least three times a day: at opening, mid-service, and closing. Each reading should be logged with the date, time, unit ID, actual temperature, staff initials, and any corrective action taken.
| Food category | Required temperature (°C) | Monitoring frequency | Record type |
|---|---|---|---|
| Chilled high-risk foods (meat, poultry, fish, dairy, RTE dishes) | ≤ 5°C | At least 3× per day | Chiller temperature log; product temperature spot-check log |
| Frozen foods | ≤ −18°C | Daily (opening) + weekly full check | Freezer temperature log |
| Hot-held foods (buffet, pass) | ≥ 63°C | Every 2–4 hours during holding | Hot-holding log; corrective action log |
| Cooked foods being cooled | 60°C → ≤ 5°C within 6 hours | At least twice during cooling | Cooling record sheet (batch ID, start time, temperatures) |
| Ready-to-eat foods in display fridges | ≤ 5°C | Every 4 hours in service | Display fridge temperature log |
Calibration records for thermometers should also be ready to show. A monthly ice-water test is a simple way to check them: the probe should read about 0°C in ice water. If a thermometer is outside the ±1°C tolerance, take it out of service straight away and record that action in the calibration log.
After temperature checks, move on to the parts of the kitchen that deal with grease, odour, and water.
Inspect ventilation, drainage, and equipment condition
Extraction hoods, filters, and the ceiling around them say a lot about day-to-day kitchen care. If an inspector sees grease on hood canopies, blocked mesh filters, or staining above the cookline, they’ll treat that as a visible hygiene failure. Before the inspection, remove and degrease the filters, wipe the outside hood surfaces, and make sure the fans are running at the right speed without odd noise or vibration. Service reports from any duct-cleaning provider should be kept on file, with the dates, areas cleaned, and any recommendations.
Drainage matters just as much. Check that floor drain strainers are in place, free from blockage, and draining well with no pooling water. Standing water near food or equipment is likely to be flagged at once. Grease traps should not be over capacity, and their lids and seals should be intact with no strong odours coming from access points. If drains are slow or backing up at sinks or dishwashers, book emergency clearing before the inspection and record the date, location, and action taken.
Equipment should also be checked with a sharp eye. Broken seals, rust, damaged shelving, and bad temperature control should all go into the maintenance log. Any affected item should be tagged out of use until it is repaired. A faulty chiller or hot-holding unit should never be left running in service.
Step 3: Control staff hygiene, pest risks, and waste handling
Next, inspectors look at staff hygiene, pest risks, and waste handling. These checks are easy to see, fast to review, and often where sites slip up.
Enforce handwashing, uniforms, and illness reporting
Make sure every handwashing station is used only for handwashing and kept separate from food prep sinks. Inspectors usually check this right away. If a handwash station is being used for anything else, it can be flagged on the spot. Each station should have soap, paper towels, and a handwash sign.
Apply the same hygiene rules on every shift. Staff should wear clean uniforms, wash hands often, and report vomiting, diarrhoea, fever, or infected wounds straight away. Any sick food handler should be removed from food-contact duties at once. Supervisors need to act on illness reports without delay.
Inspectors often ask staff to show this during the walk-through. They may watch someone wash their hands and check whether uniforms and illness controls match the written policy.
Prevent pests through monitoring and building checks
Once staff hygiene is covered, inspectors usually move fast to pest evidence and the records that support it.
Check the kitchen perimeter for entry points such as door seals, fly screens, vents, drain covers, and pipe gaps. Pay close attention to storage areas. That’s often where pest activity is less obvious and easier to miss between visits.
Inspectors will compare the site condition with the pest-control certificate, monitoring device map, and service visit log at the same time. All three should be current and match each other.
| Pest-Control Document | Inspector Focus | Failure | Corrective Action |
|---|---|---|---|
| Pest-control service certificate | Confirms a contractor is actively managing the site | Certificate expired or missing | Renew the contract and keep the current certificate on-site |
| Monitoring device map | Shows bait stations and glue boards are placed correctly | Devices missing or not shown on the map | Update the map and replace missing devices |
| Service visit log | Verifies regular visits and findings are recorded | Gaps in visit dates | Request an up-to-date log from the contractor and file it on-site |
Keep bins, bin rooms, and drains compliant
Finish with waste rooms and drains. Odour, leakage, and poor segregation tend to stand out here straight away.
Keep bin rooms and external waste areas clean, odour-free, and pest-proof. If your kitchen separates general waste, food waste, and recyclables, the right bins should be clearly labelled, and staff should follow the separation routine every time. Inspectors will check that daily practice matches the written procedure.
Check waste-area drains for pooling water, and keep grease-trap lids sealed to prevent odours and pest access.
A missed detail here - like an expired certificate, a missing device, or a bin room that doesn’t match the waste-separation procedure - is the kind of issue the checklist in Step 4 is meant to catch first.
sbb-itb-19c3c9a
Step 4: Run a pre-inspection checklist and close non-compliance gaps
At this point, the controls from Steps 1 to 3 should already be in place. Now the job is simple: make sure they still work during day-to-day service. The easiest way to do that is to turn those controls into a weekly checklist.
Use a weekly mock inspection checklist
A mock inspection works best when it matches what a real inspector is likely to review. Walk through each part of the kitchen with a simple checklist, give each item a clear owner, and add a completion date for anything that needs fixing. The table below covers the main areas to check each week.
| Inspection Area | Item Checked | Status (Pass/Fail) | Action Required | Owner | Completion Date |
|---|---|---|---|---|---|
| Documentation | Current trade licence, health cards, and HACCP logs | ||||
| Ventilation & Safety | Extraction system clean; fire suppression system in service | ||||
| Sanitation | No pooling, odours, or blockages in drains and grease traps | ||||
| Food Safety | Raw and ready-to-eat areas separated; no cross-contamination points | ||||
| Equipment | All units operational; seals intact; maintenance logs updated | ||||
| Infrastructure | Floors and walls intact and easy to clean | ||||
| Waste Management | Bin areas clean; waste segregated and disposed of according to schedule |
Review this checklist every week and close each failed item before the next service period.
Fix common failures before the inspector arrives
Expired staff health cards should be renewed straight away. If equipment stops working, deal with it fast and record the corrective action in the maintenance log. If it was fixed, replaced, or cleaned, write it down. That paper trail matters.
Plan upgrades when layout or equipment causes repeat failures
If the same item fails more than once, treat it as a root-cause issue. When the same problems keep showing up on your mock inspection checklist week after week, the layout or equipment is often the reason.
For example:
- Repeated cross-contamination risks often point to a layout that does not properly separate raw and cooked food zones.
- Persistent drainage failures are often caused by incorrect floor slopes or a grease trap in the wrong position.
- Ventilation issues can show that the extraction system is undersized for the cooking volume.
When drainage, ventilation, cross-contamination, or equipment condition keeps failing, treat it as a design or equipment problem, not just a cleaning issue. That usually means scheduling a redesign, replacing equipment, or upgrading the fit-out. When the physical setup works properly, the team can keep up with compliance during normal service instead of scrambling to patch the same problems before every visit.
Conclusion: Make inspection readiness part of daily kitchen operations
A municipality inspection should feel like a check that confirms what your kitchen already does every day. If licences are current, temperature logs are up to date, cleaning schedules are followed, and staff hygiene stays consistent, inspection readiness becomes part of normal service. It comes back to the same controls used across the kitchen: records, hygiene, temperatures, and waste handling.
Set up daily checks for refrigeration temperatures, handwashing stations, and grease trap levels. Then run one weekly mock inspection.
To keep things steady, assign one person to each compliance area and store records in an inspection file that’s ready for immediate review.
Repeat failures usually point to weak daily control, not a last-minute cleaning issue. When layout, routines, and records line up, inspection readiness becomes routine.
FAQs
How long should inspection records be kept on-site?
In the UAE, follow local rules for the required record-retention period. Keep inspection records on-site, and make sure they stay accurate and are updated straight away.
This includes HACCP plans, critical control point monitoring logs, records of deviations, and corrective actions. Check current municipal requirements regularly to stay compliant.
What usually causes a kitchen to fail inspection?
Commercial kitchens in the UAE often fail inspections for a few common reasons.
One big issue is changing the approved layout without getting sign-off first. That can mean moving equipment, shifting prep areas, or setting up the kitchen in a way that no longer matches the submitted plan. It may seem minor on the ground, but to an inspector, it’s a red flag.
Another common problem is poor ventilation and weak separation between raw and cooked food areas. If airflow is poor or food zones blur into each other, the risk of contamination goes up fast.
Inspectors also flag gaps in day-to-day food safety, such as:
- weak cold-chain management
- poor hygiene
- bad waste handling
- pest control issues
- poor staff hygiene
Fire safety is another area where kitchens run into trouble. Common breaches include blocked exits and unapproved fire suppression systems. In a busy kitchen, these aren’t small oversights. They can put both staff and the public at risk.
The result? Fines, and in some cases, temporary or full operational shutdowns.
Who should speak to the municipality inspector?
The certified Person In-Charge (PIC) should be the one speaking with the municipality inspector.
In the UAE, every food establishment must have at least one PIC who is responsible for food safety, Critical Control Points, and compliance. That matters during an inspection, because the PIC is usually the person with the clearest view of how things work day to day.
As the main point of contact, the PIC can give accurate, up-to-date details about safety procedures, cleaning schedules, and records. That helps the inspection move more smoothly and cuts down on confusion or mixed answers from staff.
